手写 Pinia
在 Vuex 中是基于 Flux 架构进行设计的,它的核心思想是单向数据流,即数据只能从 Store 向外传递到组件,组件不能直接修改 Store 中的数据,只能通过提交 Mutations 来修改。
即: view --> dispatch --> action --> mutation --> state --> view
并且 Vuex 使用一个全局的 Store 来存储应用的状态,所有组件都共享这个 Store。由此会产生较多的 modules。
而 pinia 则是将整个 store 体系进行 "拍平"。Pinia 不是使用一个全局的 Store,而是允许创建多个 Store,每个 Store 都可以独立管理自己的状态。
前置基础知识
Vue3 中有俩个不常用的 API : effect 和 effectScope, 它们是用来处理副作用的函数。有点类似于 React 中的 useEffect。
effect 函数
effect 函数是 Vue 3 提供的一个用来创建响应式副作用的函数。它接收一个函数作为参数,这个函数就是副作用函数。当副作用函数内部的响应式数据发生改变时,effect 函数会自动执行副作用函数。
import { effect } from 'vue'

const state = reactive({ count: 0 })

const stop = effect(() => {
  console.log(state.count)
})

// 更新 count 的值,会触发副作用函数执行
state.count++
在上面的代码中,我们创建了一个响应式对象 state,并且调用了 effect 函数来创建一个副作用函数。当 state.count 发生改变时,effect 函数内部的 console.log 语句会被执行。
effectScope 函数
effectScope 会创建一个 effect 作用域,可以捕获其中所创建的响应式副作用 (即计算属性和侦听器),这样捕获到的副作用可以一起处理。
function effectScope(detached?: boolean): EffectScope

interface EffectScope {
  run<T>(fn: () => T): T | undefined // 如果作用域不活跃就为 undefined
  stop(): void
}
示例:
const scope = effectScope()

scope.run(() => {
  const doubled = computed(() => counter.value * 2)

  watch(doubled, () => console.log(doubled.value))

  watchEffect(() => console.log('Count: ', doubled.value))
})

// 处理掉当前作用域内的所有 effect
scope.stop()
梳理 pinia 简单用法
第一步用 createPinia 创建注册 pinia 插件:
import { createApp } from 'vue'
import App from './App.vue'

import { createPinia } from './store/pinia'
const pinia = createPinia() // 创建 pinia

const app = createApp(App)
app.use(pinia) // 注册挂载 pinia
app.mount('#app')
第二步用 defineStore 创建 store。但是这里 pinia 有俩种创建方式,一种是 options 风格, 一种是 setup 风格。
// options 风格 store/todolist1.js
import { defineStore } from './pinia'

export default defineStore('todolist1', {
  state: () => {
    return {
      todoList: [],
    }
  },
  getters: {
    count() {
      return this.todoList.length
    },
  },
  actions: {
    addTodo(todo) {
      this.todoList.unshift(todo)
    },
    toggleTodo(id) {
      this.todoList = this.todoList.map((todo) => {
        if (todo.id === id) {
          todo.completed = !todo.completed
        }
        return todo
      })
    },
    removeTodo(id) {
      this.todoList = this.todoList.filter((todo) => todo.id !== id)
    },
  },
})
// setup 函数风格 store/todolist2.js import { defineStore } from './pinia' import { computed, ref } from 'vue' export default defineStore('todolist2', () => { const todoList = ref([]) const count = computed(() => todoList.value.length) function addTodo(todo) { todoList.value.unshift(todo) } function toggleTodo(id) { todoList.value = todoList.value.map((todo) => { if (todo.id === id) { todo.completed = !todo.completed } return todo }) } function removeTodo(id) { todoList.value = todoList.value.filter((todo) => todo.id !== id) } return { count, todoList, addTodo, toggleTodo, removeTodo, } })由此出,defineStore 需要处理兼容俩种创建情况。
组件使用
<template>
  <div>
    <div>
      <input type="text" v-model="todoText" />
      <button @click="addTodo">ADD</button>
      <p>共{{ store.count }}条</p>
    </div>

    <ul>
      <li v-for="todo of store.todoList" :key="todo.id">
        <input
          type="checkbox"
          :checked="todo.completed"
          @click="store.toggleTodo(todo.id)"
        />
        <span
          :style="{ textDecoration: todo.completed ? 'line-through' : '' }"
          >{{ todo.content }}</span
        >
        <button @click="store.removeTodo(todo.id)">REMOVE</button>
      </li>
    </ul>
  </div>
</template>

<script setup>
import { ref } from 'vue'
import useTodoListStore from '../../store/todolist1'
// import useTodoListStore from "../../store/todolist2"; // setup 风格

const store = useTodoListStore()

const todoText = ref('')
const addTodo = () => {
  if (!todoText.value.length) return

  const todo = {
    id: new Date().getTime(),
    content: todoText.value,
    completed: false,
  }

  store.addTodo(todo)
  todoText.value = ''
}
</script>
上面是 pinia 的简单使用过程。
实际手写
完整源码可见 Github
由使用过程可以看出,基本上需要自定义的基础 api 是 createPinia 和 defineStore 俩个。
手写 createPinia
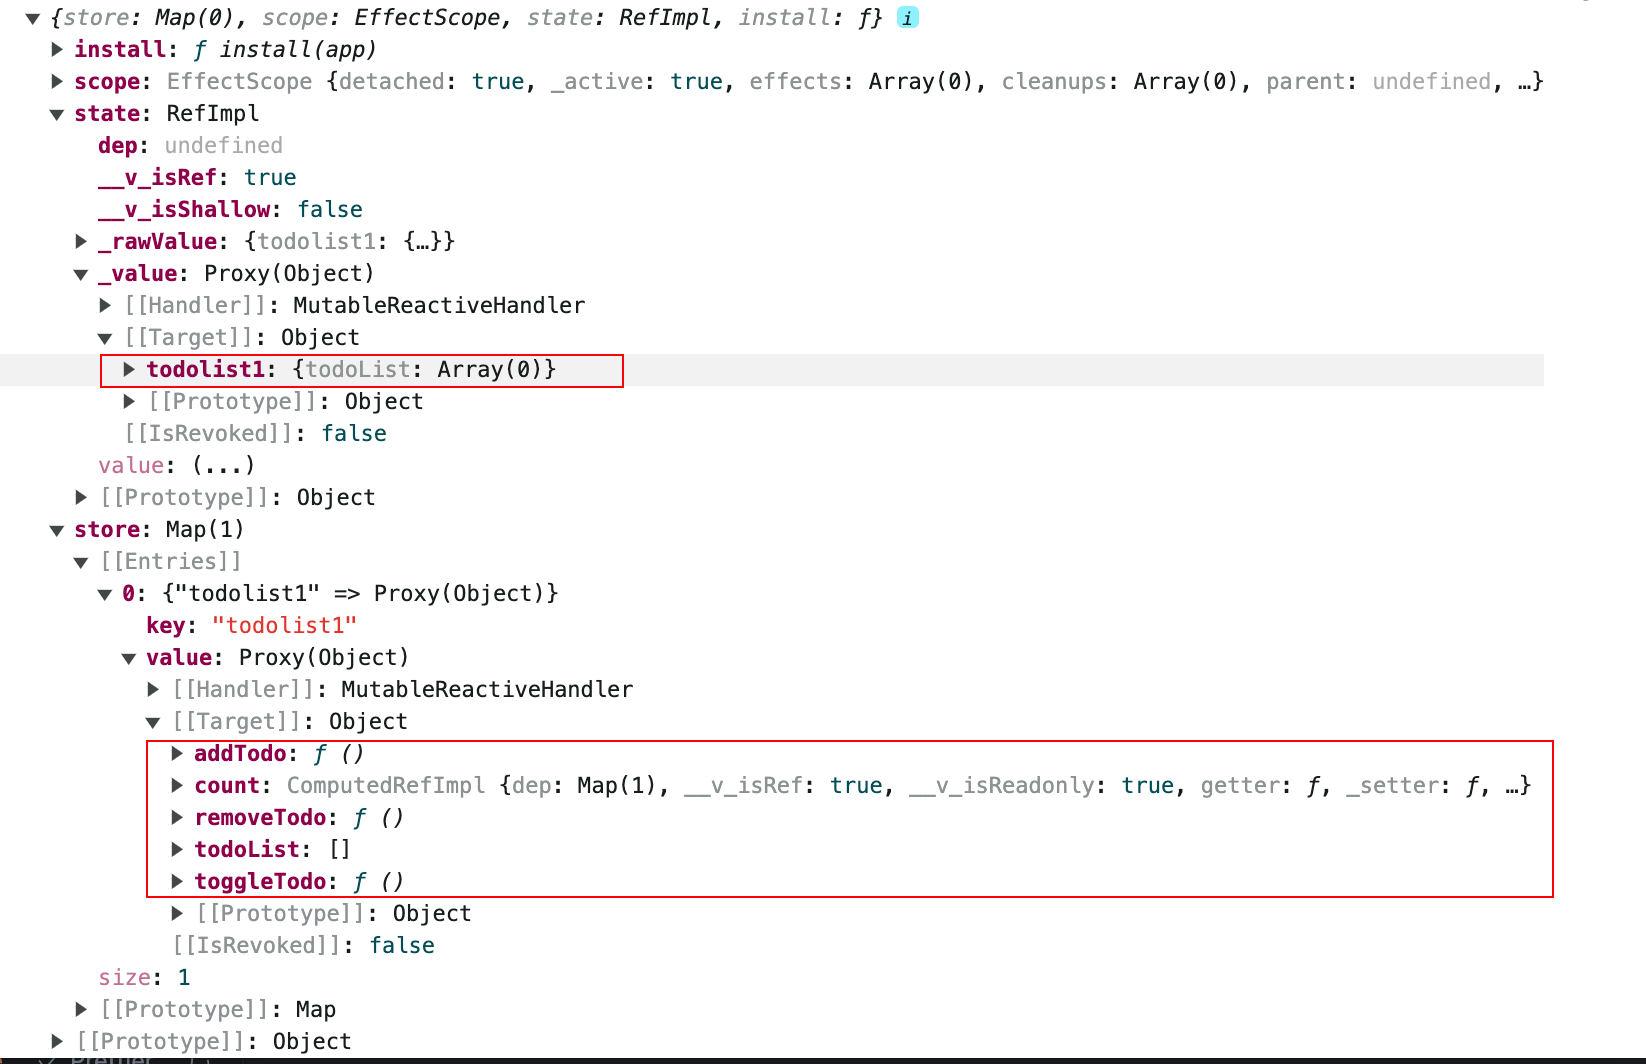
通过观察源码, 可以看出 createPinia 实际上是返回了一个对象: 分别是 store、scope、state、install。
store: 这是一个用来存储状态的对象,它是通过 createStore 函数创建的。一个应用通常会有多个 store 对象,store 对象中包含了 state、actions、getters 等属性,它们分别用来管理状态、异步修改状态、获取状态等。scope: 这是一个用来管理状态作用域的对象。在一个大型的 Vue 应用中,可能会有多个组件共享同一个 store,但是它们只想共享 store 中的一部分状态。scope 对象可以帮助我们在组件之间划分状态的作用域,从而避免状态的冲突。state: 这是一个用来存储状态的对象,它包含了 store 对象中的所有状态。在 Vue 中,状态通常是响应式的,这意味着当状态发生变化时,相关的视图会自动更新。install: 这是一个用来安装插件的函数,它接收一个 Vue 实例作为参数。通过调用这个函数,我们可以在 Vue 应用中安装 createPinia 提供的插件,从而使用 createPinia 提供的状态管理功能。
import { effectScope, ref } from 'vue'
import { piniaSymbol } from './constant'
// export const piniaSymbol = Symbol(); 以此保持唯一性

export default function createPinia() {
  const store = new Map()
  const scope = effectScope(true)
  const state = scope.run(() => ref({}))

  // 返回一个 pinia 对象
  return {
    store,
    scope,
    state,
    install,
  }
}

/** 创建注册 install */
function install(app) {
  app.provide(piniaSymbol, this) // 并全局提供该 pinia 实例
  console.log(app)
}
手写 defineStore
首先,需要明确的是我们所创建出来的 defineStore 是需要在 vue 中才能使用的。我们先以 setup 的形式进行举例
// 依据 key 定义 Store
export default defineStore('todolist2', () => {})
定义完 store 后, 再到 vue 中使用:
import useTodoListStore from '../../store/todolist2'

const store = useTodoListStore()
可以看到, 被被定义的 store 是在 vue 组件中才执行的,原因在于 我们在 createPinia 中用 app.provide(piniaSymbol, this) 所提供的方式是 provide/inject 进行数据传递,而该方法只能在 vue 中使用,不能在 js 内获取响应性。
因此, defineStore 的定义可以分为俩步, 第一步解析参数, 并依据参数区分是 options style 还是 setup style;再返回一个包含 inject 注入函数的回调函数, 该回调函数会在组件内注册时, 执行 inject 注入函数:
export default function defineStore(...args) {
  const { id, options, setup } = formatArgs(args)
  const isSetup = isFunction(setup)

  const useStore = () => {
    const pinia = inject(piniaSymbol) // 获取 createPinia 所创建的 pinia 对象

    // 查看是否已经注册该 store
    if (!pinia.store.has(id)) {
      if (isSetup) {
        createSetupStore(pinia, id, setup)
      } else {
        createOptions(pinia, id, options)
      }
    }

    return pinia.store.get(id)
  }

  // 必须返回一个函数, 因为 provide/inject 只能在 Vue 组件中使用
  return useStore
}
这里我们返回了一个 useStore 的回调函数, 并且会在组件内使用。
在该代码中, 我们还使用了俩个判断方法: isFunction 和 formatArgs 处理参数的函数。
export function isFunction(value) {
  return typeof value === 'function'
}

/** 区分俩种模式 */
export function formatArgs(args) {
  let id, options, setup

  if (isString(args[0])) {
    id = args[0]
    if (isFunction(args[1])) {
      setup = args[1]
    } else {
      options = args[1]
    }
  } else {
    options = args[0]
    id = args[0].id
  }

  return { id, options, setup }
}
setup 模式
setup 模式中, 我们定义了一个 createSetupStore 方法, 并将创建好的 pinia 对象 id 以及 definePinia 中的 setup 函数以参数形式传入了进来。目的是对这个创建 pinia 对象进行改造。
function createSetupStore(pinia, id, setup) {
  const setupStore = setup()
  const store = reactive({})

  let storeScope

  const result = pinia.scope.run(() => {
    storeScope = effectScope()
    return storeScope.run(() => compliedSetup(pinia, id, setupStore))
  })

  return setStore(pinia, store, id, result)
}
在上面代码中, 我们先执行了 setup 方法, 以此获取需要暴露的 actions 方法, 并且定义了 一个 storeScope 的作用域, 利用定义的 compliedSetup 函数, 将 setup 中的 actions 方法进行处理, 以便下面挂载到 pinia 中(以 id 作为区分 key)。
最后返回了一个 setStore 挂载 store 和处理后的 setup 的方法。
function compliedSetup(pinia, id, setupStore) {
  /**
   * state 是一个 ref 对象
   */
  // 若没有, 则初始化为空
  !pinia.state.value[id] && (pinia.state.value[id] = {})

  for (let key in setupStore) {
    const el = setupStore[key]

    if ((isRef(el) && !isComputed(el)) || isReactive(el)) {
      pinia.state.value[id][key] = el
    }
  }

  return { ...setupStore }
}
function setStore(pinia, store, id, result) {
  pinia.store.set(id, store)
  Object.assign(store, result)

  return store
}
通过 compliedSetup 将 setup 中的 actions 函数挂载到 pinia 的 state 中后,将返回的 setupStore 再挂载到 pinia 的 store 中去。整体的实现较为简单。
options 模式
options 的模式较 setup 则更加复杂一些, 因为要处理 this 的指向问题。
function compileOptions(pinia, store, id, options) {
  const { state, getters, actions } = options

  const storeState = createStoreState(pinia, id, state)
  const storeGetters = createStoreGetters(store, getters)
  const storeActions = createStoreActions(store, actions)
  return {
    ...storeState,
    ...storeGetters,
    ...storeActions,
  }
}
分别需要对 state、getters 和 actions 三个 options 属性进行处理。
function createStoreState(pinia, id, state) {
  // state : () => {}
  return (pinia.state.value[id] = state ? state() : {})
}

function createStoreGetters(store, getters) {
  /**
   * getters: {
   *  count: () => {
   *    return this.todoList.length
   *  }
   * }
   *
   * 最终需要结果为 { count: computed(() => count.call(store)) }
   */

  // keys 遍历出来的是数组 ['count', 'others']
  return Object.keys(getters || {}).reduce((wrapper, getterName) => {
    wrapper[getterName] = computed(() => getters[getterName].call(store))
    return wrapper
  }, {})
}

function createStoreActions(store, actions) {
  /**
   * action: {
      addTodo(todo) {
        this.todoList.unshift(todo);
      },
      toggleTodo(id) {...},
      removeTodo(id) {...},
    },
   */
  const storeActions = {}
  for (const actionName in actions) {
    storeActions[actionName] = function () {
      // apply(context, [...])
      actions[actionName].apply(store, arguments)
    }
  }
  return storeActions
}
分别处理后的再合并成一个 options 的 optionsStore 作为 result 返回, 后续的合并则同 setup 模式相同。复杂点在于上述的 this 指向问题的处理。
实现 $patch api
在前文中, 我们实现 store 的方式是创建一个单纯的 reactive 响应式对象: const store = reactive({}),而如果需要再往上增加 api 则需要对这个创建进行一些改造。
// 替换 const store = reactive({})
const store = reactive(createApis(pinia, id, storeScope))
我们创建一个 createApis 的方法,以对 store 挂载一些我们需要的 api。
function createApis(pinia, id, scope) {
  return {
    $patch: createPatch(pinia, id),
  }
}
此时,我们返回了一个 带 $patch 属性方法的对象,以完成替换,由此实现 store.$patch 方法的调用。接下来来实现该方法的创建。
对于 $patch 的用法可以参见官网
即可以传入一个函数, 也可以直接修改传入一个对象, 因此也需要对该入参进行判断。
export function createPatch(pinia, id) {
  return function $patch(stateOrFn) {
    if (typeof stateOrFn === 'function') {
      stateOrFn(pinia.state.value[id])
    } else {
      /**
       * $patch{
       *  count: 10
       * }
       */
      mergeObject(pinia.state.value[id], stateOrFn)
    }
  }
}

/** 简单合并, 由于可能存在递归, 所以不用 Object.assign 直接合并 */
export function mergeObject(targetState, newState) {
  for (const k in newState) {
    const oldVal = targetState[k]
    const newVal = newState[k]

    if (isObject(oldVal) && isObject(newVal)) {
      targetState[k] = mergeObject(oldVal, newVal)
    } else {
      targetState[k] = newVal
    }
  }

  return targetState
}
实现 $reset api
$reset 同 $patch 不同, 不能直接在 createApis 中添加, 原因在于 setup 模式中, 没有该方法。
由于 option 模式下 state 在 option 里面, 所以可以在 setStore 函数里多传入一个 state 参数, 以此作为区分俩种模式的方法:
function setStore(pinia, store, id, result, state) {
  pinia.store.set(id, store)
  store.$id = id // 给 store 增加一个 $id 属性, 为后续方法做铺垫

  // options 模式下多追加了一个参数 state
  state && (store.$reset = createReset(store, state))

  Object.assign(store, result)

  return store
}
此外, 在此实现的原因, 也很简单。这里能获取到初始的 state 值,保存利用该值,再结合 $patch 便可达到重置的目的了:
export function createReset(store, stateFn) {
  return function $patch() {
    const initialState = stateFn ? stateFn() : {}

    store.$patch((state) => {
      Object.assign(state, initialState)
    })
  }
}
实现 $subscribe api
$subscribe 的作用是监听 state 的状态变化。
该方法的定义: $subscribe(callback, options?): () => void, 实现较为简单。
该 api 可在 createAPis 函数中设置:
/**
 * store.subscribe(({storeId}, state) => {})
 */
function createApis(pinia, id, scope) {
  return {
    $patch: createPatch(pinia, id),
    $subscribe: createSubscribe(pinia, id, scope),
  }
}
由于需要监听, 所以引入 Vue3 中的 watch api, 监听该 store 的 state 值是否发生变化, 若发生变化则执行回调函数:
/**
 * store.subscribe(({storeId}, state) => {})
 */
export function createSubscribe(pinia, id, scope) {
  return function $subscribe(callback, options = {}) {
    scope.run(() => {
      watch(
        pinia.state.value[id],
        (state) => {
          callback({ storeId: id }, state)
        },
        options
      )
    })
  }
}
实现 $onAction api
$onAction api 的难点实际上在于使用理解。
定义: $onAction(callback, detached?): () => void
该回调函数在 action 方法执行阶段触发(常用作同步服务器的钩子函数),实际上有三个阶段: action 方法执行前, action 执行后和 action 方法执行出错。
由于有事件监听机制, 所以需要创建一个简单事件监听触发函数:
export const subscription = {
  add(list, cb) {
    list.push(cb)
  },
  trigger(list, ...args) {
    list.forEach((cb) => cb(...args))
  },
}
如上, 同有两个方法, 一个是依赖收集阶段 add 方法, 以及依赖触发发放 trigger。由于依赖都收集于数组中,所以 还需创建三个回调函数的数组。但是三个钩子的依赖数组实际上并不是统一创建的。在初始阶段只需要收集 action 执行的依赖便可, 等到 action 方法注册时, 再以此收集各方法的其它依赖。
export const actionList = []

export function createOnAction() {
  return function $onAction(cb) {
    subscription.add(actionList, cb)
  }
}
如上,在调用 $subscribe 方法时, 收集回调函数, 而后在注册 action 方法时再进行依赖收集和触发:
/**
 * store.subscribe(({storeId}, state) => {})
 */
function createApis(pinia, id, scope) {
  return {
    $patch: createPatch(pinia, id),
    $subscribe: createSubscribe(pinia, id, scope),
    $onAction: createOnAction(),
  }
}

function createStoreActions(store, actions) {
  /**
   * action: {
      addTodo(todo) {
        this.todoList.unshift(todo);
      },
      toggleTodo(id) {...},
      removeTodo(id) {...},
    },
   */
  const storeActions = {}
  for (const actionName in actions) {
    // 储存 action, 并修改 this 指向
    storeActions[actionName] = function () {
      const afterList = []
      const errorList = []
      let res

      // 新增发布订阅: 添加 after 和 onError 的事件监听
      const after = (cb) => afterList.push(cb)
      const onError = (cb) => errorList.push(cb)
      subscription.trigger(actionList, { after, onError })

      try {
        // apply(context, [...])
        res = actions[actionName].apply(store, arguments)
      } catch (error) {
        subscription.trigger(errorList, error)
      }

      // after 监听执行的异步判断
      if (res instanceof Promise) {
        return res
          .then((result) => {
            return subscription.trigger(afterList, result)
          })
          .catch((e) => {
            subscription.trigger(errorList, e)
            return Promise.reject(e)
          })
      } else {
        subscription.trigger(afterList, res)
      }

      return res
    }
  }
  return storeActions
}
实现 $dispose api
$dispose api 是停止依赖响应和注销方法。
实现也较为简单:
function createApis(pinia, id, scope) {
  return {
    $patch: createPatch(pinia, id),
    $subscribe: createSubscribe(pinia, id, scope),
    $onAction: createOnAction(),
    $dispose: createDispose(pinia, id, scope),
  }
}
待注册完后,在执行时停止依赖响应, 并卸载 store:
/**
 * 停止收集依赖, 并从注册表中删除
 * [$dispose](https://pinia.vuejs.org/api/interfaces/pinia._StoreWithState.html#-dispose)
 */
export function createDispose(pinia, id, scope) {
  // 由 pinia 获取 store
  return function $dispose() {
    // 清空 action 监控数组
    actionList.length = 0
    pinia.store.delete(id) // 清空, map 删除
    scope.stop()
  }
}
实现 #state 方法
$state 方法可以直接修改 state。
实现该 api 需要一些技巧,即在修改 state 值时,还必须保持响应性。此外, 若是单独执行, 则是获取 state 值, 修改则需要保持响应性。因此可以用 Object.defineProperty 的 get 和 set 方法来实现。
export function createState(pinia, id) {
  const store = pinia.store.get(id) // map 查找

  Object.defineProperty(store, '$state', {
    get: () => pinia.state.value[id],
    // Object.assign 这样不会丢失响应性
    set: (newState) => store.$patch((state) => Object.assign(state, newState)),
  })
}
由此直接在 setState 中进行 state 方法注册即可:
function setStore(pinia, store, id, result, state) {
  pinia.store.set(id, store)
  store.$id = id // 给 store 增加一个 $id 属性, 为后续方法做铺垫

  // options 模式下多追加了一个参数 state
  state && (store.$reset = createReset(store, state))

  Object.assign(store, result)

  // 增加 $state 方法
  createState(pinia, id)

  return store
}